Page 1
Page 2 Page 3 Page 4 Page 5 Page 6 Page 7 Page 8 Page 9 Page 10
|
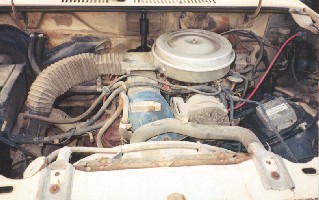 |
This is the 2.0 that came out...as you can see, it was nothing to look at either. This
engine swap is not as difficult as it might appear, aside from the conversion to EFI in this particular
case. The EFI Turbocharged 2.3 that replaced this 2.0 actually popped out of the same mold, so all of
the motor mounts and other bits and pieces bolted up just like they came off. I didn't take advantage of all of that, as I chose to switch to the later Ranger serpentine belt setup and a later Ranger transmission, but the fact that I could have makes this potentially a very economical engine swap as
opposed to some others. |
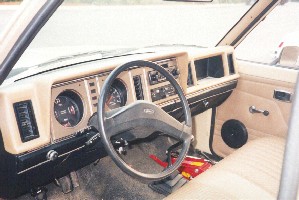
| And this is the interior I started with. As you'll see as time progresses, this is one area I really went to work on. The first thing I had to address was instrumentation - as it sat in this picture it had a speedometer and a fuel gauge, with warning lights for everything else. The common practice with the first generation Rangers is to replace the speedometer with a 5-3/8" aftermarket, and the other (left side) hole gets a matching tachometer, but I needed more than that with the turbocharged engine, so I decided to design and fabricate my own panel. |
 |
| At this point, the turbo engine was disassembled and taken to the machine shop
for a good going-over. In retrospect, it didn't really need it - the factory hone marks were still
visible and there was no ridge at the top of the #1 cylinder. But with over 115,000 miles on it and
not having heard it run before I bought it, I figured the "better safe than sorry" approach would be
best. I then drove the truck (in as-purchased condition) two hours north to my parent's then-vacant
house where I planned for it to be out of the way (and under a car port) until I got the new engine
in it and running. I originally planned to leave the truck in running condition until everything was
ready, then do a weekend swap on it, but I needed the flywheel (they're the same) so I went ahead and
removed the 2.0/4 speed. |
 | So here's the truck up on jack stands after the engine was out. Part of the motivation behind this project for me was a good excuse to pick up the equipment and tools I would need to do this (I plan to be doing this kinda thing all my life) and the engine hoist was invaluable here. :) Anyway, there were no special gotchas in pulling it...forgot to pull the choke cable off, but it came out. I pulled the engine and transmission as a unit, and they cleared the core support ok with just a little coaxing. As you can see, I also had the bed off...I planned to prime and paint the entire frame while waiting on the engine. |
| And this is what I found under the bed. Check out the original exhaust system - I ended up removing it with a hammer. The spare is going away, but I'm leaving the support it rests on for whatever slight chassis stiffening it offers. The gas tank shown has since been replaced with one out of an EFI truck...
since all 83 Rangers were carbureted, the tanks used a smaller opening that the later EFI pump/sending unit assembley won't fit through. The alternative to switching tanks is to use an inline electric pump and plumb the return line into the filler neck, but I prefered to switch tanks. The rear shown is the original 6-7/8" 3.08 rear that will get replaced with a 3.73 8.8" disc brake rear out of an Explorer. |
 |
 |
|


