Page 1
Page 2 Page 3 Page 4 Page 5 Page 6 Page 7 Page 8 Page 9 Page 10
|
 |
At this stage I started doing some small cosmetic things as well, and the truck moved from
2 hours away from me to my front yard (The second time it had moved). The headlights were changed for
these from Diamond Back that convert from the old sealed-beam style to plug-in halogen bulbs. Besides
the fact that they look cool, they should offer much better light with the Wizard bulbs. |
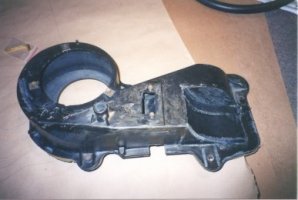
| While I was waiting on other things, I modified the heater box so that it would clear the turbo exhaust elbow, and the oxygen sensor that is located in that elbow. This is basically a mockup, I cut it with a hacksaw and flipped over the cut off part, then hot-glued it back in place. I'll use this to have a heat shield built, then I'll build a fiberglass heater box replacement. The heat shield should take the brunt
of the punishment, and the fiberglass will be ok I think. In addition to clearing the turbo, the back of the box was also cut to bring the wiring harness bundle up behind it. |
 |
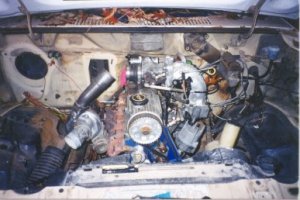 | I then installed the turbo and exhaust manifold that I had as test pieces. This is a T3 that would be used as a core for the T3/T4 hybrid I was having built, and the E6 seen here would be offered in exchange for the porting on another that I had supplied to the turbo shop, but this would get it going and allow me to place things so I'd be ready when the ported E6 and hybrid turbo were ready. As you can see, I had also bolted up the modified 92 Ranger power steering bracket at this point. I cut off the A/C compressor mounting pad and trimmed the back side of the bracket to clear the distributer. |
| Seen from the side, where you can really see the clearance issue with the turbo and the heater box. The
output pipe on the turbo is from a non-IC application, it would eventually get piped to a front mounted TC
intercooler.You can also see the 92 Ranger alternator bracket, which did not require any modification, and
the VAM placement. This placement required moving the battery, which I chose to locate under the bed. You
can also see the beefy 4.0 radiator, which did require modification. I cut the lower post mounts off, and
drilled holes in the core support for the upper screws. |
 |
 |
|


